| Home
Persona
My Work
Burgundian Gown
Burgundian Images
Current Projects
Kirtle Project
Kirtle Images
Links |
|
|
A Burgundian Gown: Step-by-Step
|
|
| The Dress
One of the most elaborate styles of dress from the high middle ages is the Burgundian gown. These gowns were worn in Burgundy (obviously) and the Netherlands in the mid-to-late 1400's.
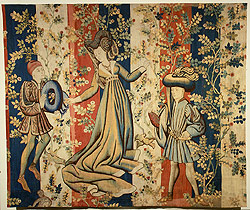
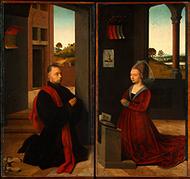
This tapestry (from the Metropolitain Museum of Art) is one example of period artwork showing what I call a "Burgundian" gown. (Click to Enlarge) There are more examples of period artwork on the "Burgundian Images" page of this website. |
The Theory
As I see it, these are the key features that distinguish Burgundian gowns from other dresses worn in the middle ages:
* Deep V-neck: the gown has turned back lapels (often in fur, sometimes velvet) which form a very deep neckline, which would be very immodest without some form of inset.
* Inset: there is a modesty panel that fills in the v-neck. I support the theory that this is either an underdress or a panel pinned to the underdress, rather than a piece sewn into the overdress (one-layered dresses are a modern phenomenon). (Apparently there is a painting that shows the inset pinned to the underdress, but I don't know the name of it.)
* High, wide belt: the dress is belted just under the bust with a belt that appears to be about 4 inches wide. The belt doesn't seem to generally match the dress, can be decorated, and is buckled in the back. (Although one painting by Rogier van der Weyden painting shows the belt buckled in front, see the images page)
.
|
* Skirt: The fullness of the skirt increases from the belt to the floor. I have seen books that suggest that the skirt was gathered onto a bodice (with the seam under the belt), but I tend to feel that a one piece (circular cut, with fullness increasing from the shoulder or under the bust) dress will re-create the look more accurately. Also, the circular cut appears to be how contemporary houpellandes (unbelted, different collars and sleeves) were constructed.
Looking at "Portrait of a Female Donor" by Petrus Christus, we can see that there are wrinkles above the belt. (Click on the image to see a closeup of her waist.) I believe that these wrinkles support the notion that the fullness starts above the belt possibly at the shoulder, rather than having a separate skirt attached. |
|
* Hem: There is usually a wide band around the hem of the gown. It is made from the same fur/velvet as the lapels.
* Sleeves: The sleeves generally appear to be close fitting, with turned back cuffs of the same fur/velvet as the lapels and hem.
Headgear: The headdresses worn with these gowns are an entire topic of research in themselves. The dresses are often seen with hennins, truncated hennins, or forked headdresses. The headdress is part of what completes the 'over-the-top' look, and shouldn't be skipped. A page similar to this one on my version of the headdress will be forthcoming.
|
|
|
The Materials
For the gown, I have used:
* 12 yards of emerald green shot silk jacquard (45" wide)
* 12 yards of broadcloth (45" wide)
* 2 1/2 yards of black cotton velvet (60" wide)
I did not use a pattern for this dress, but rather created the shapes as I went along. Aside from shaping the armhole and sleeve cap, the entire dress can be drafted with a string and a ruler.
DISCLAIMER: This webpage shows how I made a dress, I make no claims to be right or historically accurate. This is my technique, based on my best guesses. Use this info at your own risk! :-)
|
Step 1: Interlining and cutting
The silk I used (sari silk) was a very light, sheer material, I used broadcloth is to interline it and add body. Interlining causes the fabric to behave as if it is a heavy piece of cloth, rather than being light and wispy. Period illustrations show cloth draped as if it had a heavy hand.
The silk is stitched to the broadcloth, so it acts as one piece of fabric. The silk is cut in 4 yard sections, and sewn selvege to selvege (to make a big square). The center of the square is marked by folding it in half, and a string (anchored in the center) is used as a guide to cut a full circle.
|
|
|
|
Step 2: Armholes and sleeves
In order to make this huge circle of cloth into a dress, it is necessary to add sleeves. I found the center of the cloth, and marked where the tops of my shoulders would be. (My shoulders are 18"wide, so the two points are 9" each side of center)
From the shoulder point, I added seam allowance/ease and drew in the armhole. I tend to "eyeball" things like this, but if you don't have alot of sewing experience, a dressmaker's curve could be used. The armscye is curved slightly, so the top of the sleeve is set in about 2" from the underarm seam. (This is a shallower curve than modern patterns have). |
From the bottom of the armhole, I extended a line out to the corner of the hem, and cut off the extra fabric.
For the sleeves, I cut close fitting sleeves that are about 3" past the point of my wrist, with the last 3" flared out (this will form the turned back cuff). The top of the sleeve matches the shape of the armhole. The sleeves were sewn on, and gussets were added under the arm for ease of movement. I am working on a page that shows how to put gussets in. (It's not that hard once you get the hang of it, but can be tricky to wrap your brain around!)
|
Step 3: The Collar
The shape of the collar was drafted using only a ruler. I tried on the dress and marked the point ("A") where the collar should come down to (just under the bust).
Using a ruler I drew lines from point "A" to the top of the shoulder at the sleeve seam. I also drew a set of lines from point "A" to about 3" inside the first set of lines. This is the outline of the collar shape on the front of the dress. On the back of the dress, the collar has the same shape, but has a square neck, rather than a deep V. (See drawings in Mary Houston's book)
I transferred the pattern to newspaper, adding 1/2" of seam allowance on all sides. The pattern was used to cut one piece from lining (broadcloth) and one piece from velvet.Place right sides together, and stitch around the outside of the collar.
Clip seams and turn; this finishes the outside edge of the collar and will allow it to sit on top of the dress as lapels. I used the inside of the pattern to cut away the neckline of the dress (so the neckline of the dress matches the inside of the collar). Pin the collar to the dress (right side of velvet to inside of dress) and stitch around the neckline. Turn the collar to the right side, press (on the wrong side, with lots of steam to protect the velvet) and tack the collar down. |
|
|
|
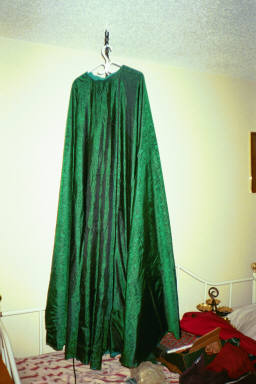
Step 4: Let the garment hang
The unhemmed dress is put on a hanger and allowed to hang from a hook on the ceiling for several days; This allows the weight of the fabric to distort the grain before the hem is marked. If you don't do this, the grain will be distorted after you mark a perfectly even hem. I suffered with uneven hems for years before learning to do this! This step is especially important for heavy fabrics, large skirts, or loosely woven fabrics.
|
Step 5: Hem and Cuffs
Wearing the dress, have someone mark the hem to the desired length. The dress should be floor length in front, and may have a train in the back. It doesn't have to be quite as long as the dress in the tapestry at the top of the page!
Cut strips of velvet, curved to match the hem. That is, don't cut them straight! The image to the right shows that the hem is a full circle. For the dress I made, I cut the strips about 6" wide. Also cut pieces from the velvet for the cuffs. These should be the same shape as the end of the sleeve.
Right side of velvet to inside of dress, stitch along the hem. Flip the velvet around to the right side of the dress, press, and hand-stitch the top edge of the velvet to the dress. Do the same for the cuffs.
|
|
|
|
Step 6: The belt
Cover a 3.5" strip of buckram with the material for your belt. Add a buckle, and trim as desired. My version of this belt uses plastic embroidery canvas (no local sources of buckram!) covered in burgundy velvet. In lieu of a buckle, the belt is laced in the back with the laces tucked out of the way. |
|
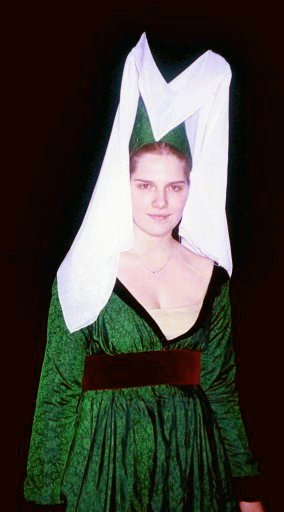
Step 7: The finished dress, with butterfly hennin
These images show the dress in its finished form. The butterfly hennin is based off instructions on the most wonderful hennin website.
|
|
|
|
P.S. As a side note, I entered this outfit in the Costumer's Guild Court Garb Contest at AnTir 12th Night, AS XXXV and I won the "judges special award"! I guess the judges liked what they saw, even though I did not win in the category I entered in. It was the first competition I have entered for anything, and alot more fun than I expected it to be.
|
|
|