| Home
Persona
My Work
Burgundian
Images
Gusset How-To
Links |
|
|
Inserting a gusset: Step-by-Step
|
|
| Introduction
Underarm gussets are a part of many different kinds of medieval clothing, adding wearing ease to an otherwise close fitting sleeve. I have never found good, practical instructions on how to insert gussets, and if other people have as much difficulty with them as I originally did, this page should be useful.
I have tried to make these instructions as clear as possible, which is the reason for the length. Inserting a gusset is not a terribly hard task once you figure it out, but it can be mind boggling if you haven't figured it out (at least that's how I was!) |
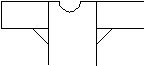
What is a gusset?
In the drawing of a basic tunic, gussets are the little triangular pieces under the arm. From what I understand, the gussets were historically cut as squares (and folded diagonally), rather than triangles. NOTE: All of the diagrams here are meant as a reference only, they are most definitely not to scale!
|
|
|
|
|
Instructions
These instructions go through the insertion of one gusset into a tunic or gown. All of my references are to the right sleeve (ie the one that is on the left when the garment is laying on the table in front of you). Before inserting the gusset, you should attach the front of the tunic to the back at the shoulder seam (if there is a seam there). Also, attach the sleeve but don't sew up the underarm seam. When you attach the sleeve, leave the last 1/2" at each end of the armscye (armhole) seam unsewn.
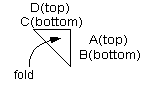
Each gusset is made from a square of cloth that is approximately 4 inches on a side. (The exact dimension is not important, a larger square will add more ease). I have labeled each side of the gusset as "A", "B", "C" and "D" (these labels are looking at the gusset from the correct side of the fabric). |
Once the gusset is sewn to the rest of the tunic, it will lay as shown in the diagram here. The square has been folded along the diagonal, and side "A" is on top of side "B"; side "D" is on top of side "C". From this, you can tell that "A" will be sewn to the side front of the tunic, and "B" will be sewn to the side back of the tunic. "D" will be sewn to the front half of the sleeve, and "C" will be sewn to the back half of the sleeve.
|
|
|
|
On the wrong side of the fabric, make a dot near each corner. The dot should be 1/2" from the edge in each direction. This will be the start and end of your sewing lines. Line up side "A" (right side down) with the front side edge of the tunic and pin it in place. The dot at the top of side "A" should line up with the end of the armscye seam (which doesn't go right to the edge of the fabric). Sew along side "A", starting and stopping at the dots. Now, pin side "D" to the front of the sleeve. One end of edge "D" is already secured at the armscye seam, so it should be easy to see where the gusset need to be pinned. Sew edge "D" to the sleeve, again starting and stopping at the dots. |
Repeat this process for the back of the sleeve. Pin edge "B" to the back side seam (right sides together!), matching the dot to the end of the armscye seam. Sew in place. Finally, pin and sew side "C" to the back of the sleeve. Now the rest of the underarm seam can be sewn. Sew the sleeve from the point where the two gusset seams on the sleeve meet down to the wrist. Similarly, sew the side of the body, starting where the two gusset seams on the body meet.
You will need to be fairly precise on where your seams start and stop for the gusset to lay flat. If you are new to sewing, it might be easier to insert the gusset by hand. It took several tries before I could do this right the first time on the machine. |
|
|
Conclusion
I think that inserting the gusset seems difficult to modern seamstresses, as we (or I, at least) tend to think of pieces of fabric laying flat so they can go through the machine. When you work through these instructions, you will find that the gusset does not lay flat compared to the rest of the garment.
I hope that you found these instructions useful and clear. I would love to hear from you if you have any feedback, good or bad. Please email me at meghan@caerleon.freeservers.com |
|
|